目录

- .githubCreate FUNDING.yml4年前
- .vscodeadd pretrained3年前
- archived_untest_filesRefactor Project to 3 parts: Models, Control, Data3年前
- controlSome changes to make it easier to install the dependencies3年前
- datareove encoder an decoder5个月前
- datasets_downloadadd docker support (#802)3年前
- modelsfix:preprocess_audio.py--The .npy file failed to save (#988)2年前
- monotonic_alignadd pretrained3年前
- skillsAdd tts skill5个月前
- utilsadd pretrained3年前
- .dockerignoreadd docker support (#802)3年前
- .gitattributesInit to support Chinese Dataset.5年前
- .gitignoreadd pretrained3年前
- CODE_OF_CONDUCT.mdCreate CODE_OF_CONDUCT.md5年前
- Dockerfileadd docker support (#802)3年前
- LICENSE.txtInit to support Chinese Dataset.5年前
- README-CN.mdEnv update 添加环境需求注释 (#660)2年前
- README-LINUX-CN.mdUpdate README-LINUX-CN.md2年前
- README.mdUpdate README.md (#1030)7个月前
- demo_toolbox.pyinit3年前
- docker-compose.ymladd docker support (#802)3年前
- docker-entrypoint.shadd docker support (#802)3年前
- env.ymlSome changes to make it easier to install the dependencies3年前
- gen_voice.pyRefactor Project to 3 parts: Models, Control, Data3年前
- pre.pySkip embedding (#950)2年前
- requirements.txtUpdate requirements.txt (#747)1年前
- run.pyAdd vits3年前
- train.pyAdd vits3年前
- vits.ipynbadd pretrained3年前
- web.pyRefactor Project to 3 parts: Models, Control, Data3年前
邀请码
版权所有:中国计算机学会技术支持:开源发展技术委员会
京ICP备13000930号-9
京公网安备 11010802047560号
Features
🌍 Chinese supported mandarin and tested with multiple datasets: aidatatang_200zh, magicdata, aishell3, data_aishell, and etc.
🤩 PyTorch worked for pytorch, tested in version of 1.9.0(latest in August 2021), with GPU Tesla T4 and GTX 2060
🌍 Windows + Linux run in both Windows OS and linux OS (even in M1 MACOS)
🤩 Easy & Awesome effect with only newly-trained synthesizer, by reusing the pretrained encoder/vocoder
🌍 Webserver Ready to serve your result with remote calling
DEMO VIDEO
Quick Start
1. Install Requirements
1.1 General Setup
pip install -r requirements.txtto install the remaining necessary packages.pip install webrtcvad-wheels(If you need)or
install dependencies with
condaormambaconda env create -n env_name -f env.ymlmamba env create -n env_name -f env.ymlwill create a virtual environment where necessary dependencies are installed. Switch to the new environment by
conda activate env_nameand enjoy it.1.2 Setup with a M1 Mac
1.2.1 Install
PyQt5, with ref here.PyQt51.2.2 Install
pyworldandctc-segmentationpyworldbrew install pythonPython.hcan come with Python installed by brewexport CPLUS_INCLUDE_PATH=/opt/homebrew/Frameworks/Python.framework/HeadersThe filepath of brew-installedPython.his unique to M1 MacOS and listed above. One needs to manually add the path to the environment variables.pip install pyworldthat should do.ctc-segmentationgit clone https://github.com/lumaku/ctc-segmentation.gitcd ctc-segmentationsource /PathToMockingBird/venv/bin/activateIf the virtual environment hasn’t been deployed, activate it.cythonize -3 ctc_segmentation/ctc_segmentation_dyn.pyx/usr/bin/arch -x86_64 python setup.py buildBuild with x86 architecture./usr/bin/arch -x86_64 python setup.py install --optimize=1 --skip-buildInstall with x86 architecture.1.2.3 Other dependencies
/usr/bin/arch -x86_64 pip install torch torchvision torchaudioPip installingPyTorchas an example, articulate that it’s installed with x86 architecturepip install ffmpegInstall ffmpegpip install -r requirements.txtInstall other requirements.1.2.4 Run the Inference Time (with Toolbox)
vim /PathToMockingBird/venv/bin/pythonM1Create an executable filepythonM1to condition python interpreter at/PathToMockingBird/venv/bin.chmod +x pythonM1Set the file as executable.pythonM1(steps here), if using command line python, run/PathToMockingBird/venv/bin/pythonM1 demo_toolbox.py2. Prepare your models
You can either train your models or use existing ones:
2.1 Train encoder with your dataset (Optional)
Preprocess with the audios and the mel spectrograms:
python encoder_preprocess.py <datasets_root>Allowing parameter--dataset {dataset}to support the datasets you want to preprocess. Only the train set of these datasets will be used. Possible names: librispeech_other, voxceleb1, voxceleb2. Use comma to sperate multiple datasets.Train the encoder:
python encoder_train.py my_run <datasets_root>/SV2TTS/encoder2.2 Train synthesizer with your dataset
Download dataset and unzip: make sure you can access all .wav in folder
Preprocess with the audios and the mel spectrograms:
python pre.py <datasets_root>Allowing parameter--dataset {dataset}to support aidatatang_200zh, magicdata, aishell3, data_aishell, etc.If this parameter is not passed, the default dataset will be aidatatang_200zh.Train the synthesizer:
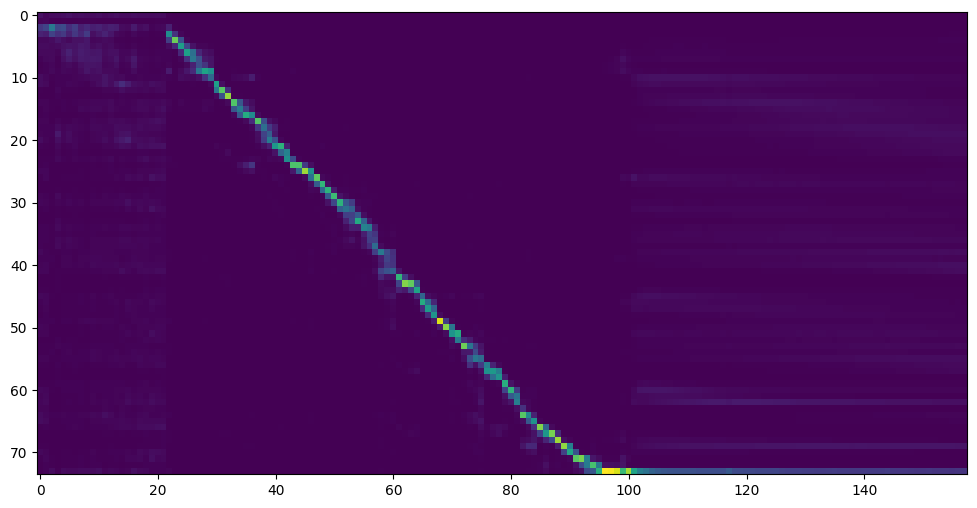
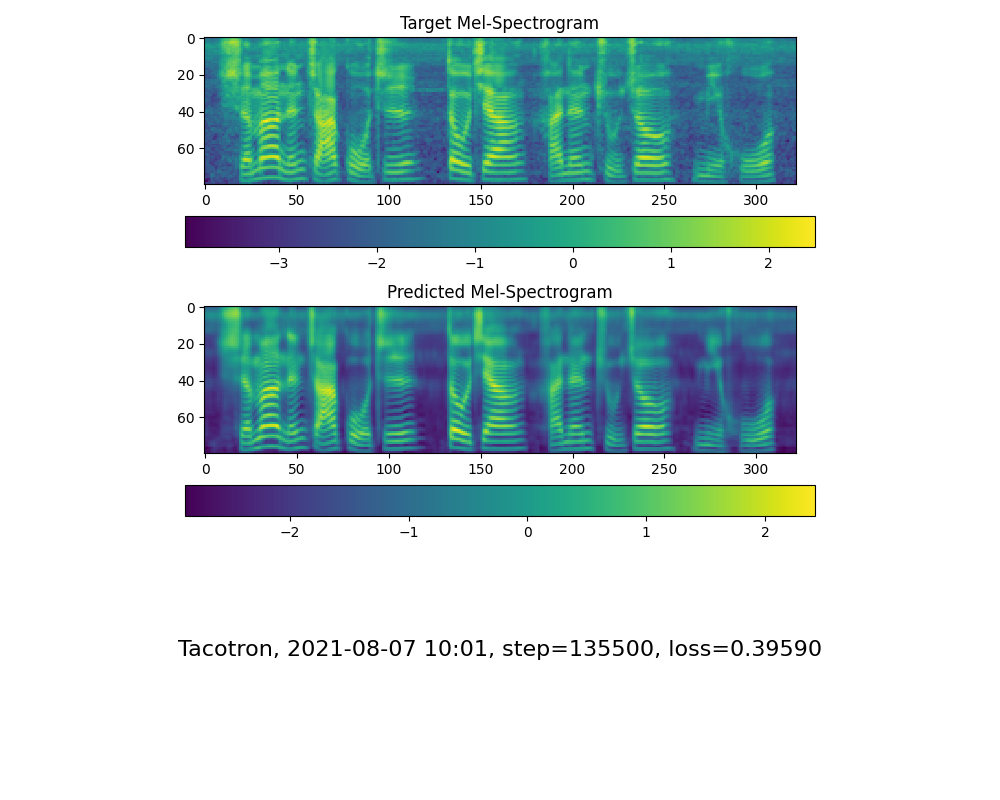
python train.py --type=synth mandarin <datasets_root>/SV2TTS/synthesizerGo to next step when you see attention line show and loss meet your need in training folder synthesizer/saved_models/.
2.3 Use pretrained model of synthesizer
2.4 Train vocoder (Optional)
Preprocess the data:
python vocoder_preprocess.py <datasets_root> -m <synthesizer_model_path>Train the wavernn vocoder:
python vocoder_train.py mandarin <datasets_root>Train the hifigan vocoder
python vocoder_train.py mandarin <datasets_root> hifigan3. Launch
3.1 Using the web server
You can then try to run:
python web.pyand open it in browser, default ashttp://localhost:80803.2 Using the Toolbox
You can then try the toolbox:
python demo_toolbox.py -d <datasets_root>3.3 Using the command line
You can then try the command:
python gen_voice.py <text_file.txt> your_wav_file.wavyou may need to install cn2an by “pip install cn2an” for better digital number result.Reference
F Q&A
1.Where can I download the dataset?
2.What is
<datasets_root>?If the dataset path is
D:\data\aidatatang_200zh,then<datasets_root>isD:\data3.Not enough VRAM
Train the synthesizer:adjust the batch_size in
synthesizer/hparams.pyTrain Vocoder-Preprocess the data:adjust the batch_size in
synthesizer/hparams.pyTrain Vocoder-Train the vocoder:adjust the batch_size in
vocoder/wavernn/hparams.py4.If it happens
RuntimeError: Error(s) in loading state_dict for Tacotron: size mismatch for encoder.embedding.weight: copying a param with shape torch.Size([70, 512]) from checkpoint, the shape in current model is torch.Size([75, 512]).Please refer to issue #37
5. How to improve CPU and GPU occupancy rate?
Adjust the batch_size as appropriate to improve
6. What if it happens
the page file is too small to complete the operationPlease refer to this video and change the virtual memory to 100G (102400), for example : When the file is placed in the D disk, the virtual memory of the D disk is changed.
7. When should I stop during training?
FYI, my attention came after 18k steps and loss became lower than 0.4 after 50k steps.